16 December 2010

Handmade for the Holidays: Pompeii Street Soap Co.

For Handmade for the Holidays I will be spotlighting a handful of artists and crafters that have made some very amazing pieces that I've gifted over the past few years to my friends and family.  Each one took the time to create the most perfect item I could have asked for.  It is, in my little way, a thank you to those individuals.  I hope that by reading my little Handmade for the Holidays list you too might be inclined to pay these little shops a visit and enjoy their fantastic work.
Next up is Pompeii Street Soap Co., a natural soap shop located in central Pennsylvania.  Though I may have never purchased this wonderful soap as a gift to anyone other than myself, it is a Handmade for the Holidays feature because I get ridiculously giddy with the thought of opening a new bar of soap and everyone deserves to have that feeling.  Really, these products are amazing.

Motivated by a love of aromatherapy, her own dry skin, and the desire to be her own boss, Jessica Gill started the company in her basement in 2001.  All products are at least 98% natural (with most being 100% natural) and everything is made with a gourmet touch. All products are hand made, cut and packaged by caring human hands on the premises in her workshop and store in Mifflinburg, Pennsylvania.

Jessica’s interest in soap was heightened after reading about the discovery of a perfectly preserved soap shop unearthed in the ruins of the ancient town of Pompeii, Italy, which, in 79 AD, was blanketed in ash after Mount Vesuvius’ devastating eruption.  This small, ancient soap shop is thought to be the oldest existing, organized soap shop.  Jessica chose the name Pompeii Street Soap Company as a reflection of her business’ ideals and goals to produce all natural soaps in an old fashioned way.*

Orange & Clove: 100% NATURAL. Pure Orange peel and clove oils combined with ground spices make this soap bar richly scented and uplifting. Lathers great and smells like a traditional Colonial Christmas ornament. Special Edition

09 December 2010

Handmade for the Holidays: Make Your Dog Smile by Hattie Rex

For Handmade for the Holidays I will be spotlighting a handful of artists and crafters that have made some very amazing pieces that I've gifted over the past few years to my friends and family.  Each one took the time to create the most perfect item I could have asked for.  It is, in my little way, a thank you to those individuals.  I hope that by reading my little Handmade for the Holidays list you too might be inclined to pay these little shops a visit and enjoy their fantastic work.

First up is the Etsy shop Make Your Dog Smile by Hattie Rex.  If you are a lover of animals I urge to take a look at this little shop.  Make Your Dog Smile is the work of Tessa, who lives in rural Missouri with her husband, four dogs and a cat named Merle.  Between working on her master's degree in Technical Communication and writing part-time for various media, Tessa somehow finds the time to hammer out really fun id tags for pets.

Shortly before we officially adopted Heidi, I began my search for a special id tag to adorn her collar.  I searched through so many fun and interesting pet id tags on Etsy but I always seemed to come back to Tessa's little shop.

Handmade for the Holidays

With all of the hustle and bustle of the holiday season quickly consuming us, I wanted to dedicate a few posts to buying handmade and showcase a few artists and crafters I've purchased from in the past.  


Now that buying handmade is so much more accessible, thanks to online sites like Etsy and Artfire and independent brick and mortar stores, I've found myself shopping for handmade whenever I can.  Grace Dobush, in the first chapter of her book Crafty Superstar: Make Crafts on the Side, Earn Extra Cash and Basically Have It All, discusses the reasons for the handmade revolution.  She explains that it stems from an appreciation that people have with the makers.  She quotes Lauren Bacon, co-author of The Boss of You- "Artistry is so incredibly valuable now because it keeps us in touch with human relationships."  This idea of human connection is exactly why I try to shop handmade. It is such a great feeling when you know the story behind the object that you are purchasing.  It is an even greater feeling when you can pass that story onto the recipient of said object.  But perhaps the best feeling of all, for me anyhow, is knowing that I am supporting an independent artist/crafter/maker/designer in something that they are passionate about so they can continue doing what they love to do.  It is, as Dobush reminds us, an alternative to sweatshops and the mass produced goods of the big box stores.

02 December 2010

Martha Stewart's Apple Crumb Pie

This year we spent Thanksgiving with Dan's family. Because of this, we spent the weekend before with my family for a little advance Thanksgiving feast.  I wanted to make a dessert and opted for apple pie because it hadn't been claimed yet and honestly, what is Thanksgiving without apple pie?    After scouring recipes for the perfect specimen, I decided upon this pie by Martha Stewart.  How can one go wrong with Martha Stewart?  Apparently, I found a way.
I wanted to like this.  I really, really did.  It was the slightly too large crust/crumb topping combination that called out to me.  It reminded me of a galette, but with a fun, crumbly topping.  Surely, the best of both worlds.  Every single review, all 17 of them, raves about this amazing pie.  For me, it fell short in a few ways and I think I am partly at fault. 

I don't mean to be a stranger

I don't mean to be a stranger, I really don't.  Honestly, there has been so much going on around here lately with the holidays, a full time job, and a new addition to the little family...


...it's hard to get all my posting in.  But I'm not complaining one bit.  No siree.  In fact, I'm vowing to post much more often.  To start off with, I have a handful of recipes I'd love to share with you- some flops, some glowing successes, but all worth sharing.  Plus, I'm compiling a great little holiday gift guide and I've been working on some new pieces that I am very, very excited about.  A sneak peak:


I hope you all had a wonderful Thanksgiving filled with loved ones, warmth, laughter and delicious food.  Please stay tuned for more to come.  Promise.

19 November 2010

A bracelet of Snowflake Obsidian

I've completed another custom order and I must admit, I really love custom orders!  I whipped this bracelet up this week after a friend of mine requested that I make a bracelet for the "team mother" of her sons' football team.


I didn't have much time to work on it, as she needed it by Saturday, so polymer clay beads were out of the question.  When discussing the style, my friend explained to me that it would be great if I could create the bracelet in the team colors- red and black.  (The most excellent of ideas in celebration of a great season.)

06 November 2010

Finally, photos

Today, I finally got around to taking photos of my work for my Etsy shop.  I had hoped to take them outside, in natural lighting, but had to opt for my living room instead since the outdoor light wasn't ideal.  This multi-strand necklace consists of seven of my polymer clay beads, shell beads, vintage brass chain and vintage brass beads.

03 November 2010

Howl-o-ween Scarf

A festive scarf for our little beagle, Heidi.  I had no desire to dress my little one up in an uncomfortable costume for her first Halloween with us, but I did think she needed something to show the spirit of the holiday.
This scarf/bandana was a snap to make, and best of all, I was able to utilize my stash.  I'm pretty happy with the way it turned out but I do wish I had made it to fit over her collar.  She didn't seem to mind this new accessory, but I do think she wore it to humor me.  (According to Dan, at one point when I wasn't looking she attempted to eat it.) 
I'm thinking a turkey-themed scarf is in store in the coming weeks.  However, it will be a fit over the collar scarf which should allow it to sit peacefully and comfortably at her back, without falling forward like this candy corn scarf.  Also, this should prevent her from being tempted to eat it for lunch.... or dinner.... or breakfast :)

Something to agree upon

Dan and I, as different as we may seem, agree on most things.  We both love to travel and explore new restaurants.  We enjoy waking up early for a day of flea marketing and antiquing. We love whizzing through the city on our bikes or taking a stroll down town, not knowing where we might end up.  We both go ga ga over craft beer and adore exploring new wines. 

But for all that we agree upon, there are two very important things that we will never see eye to eye on.  The first being desserts.  I find much joy in a simple, delicious dessert to end a meal.  Dan, on the other hand, is not phased in anyway with my oohs and aahs as I fawn over the sweet confections.  He'd much prefer a second entree.  The second is soup.  Don't get me wrong, we both love soup.  However, Dan is rather particular over his.  Where I'm usually game for any soup placed in front of me, Dan tends to steer clear any soup that has been puréed.  I suppose he feels cheated in a way- having had to drink his meal rather than chew it.  It is unfortunate for him that the majority of the soups I make are puréed.

I've been trying to take his preference into consideration when I plan a soup, but some times one (i.e. Dan) must take one for the team (i.e. me).   When roasted butternut squash and curry and coconut milk are involved, I win.  Luckily for me, Dan also loves curry and coconut milk and though he hates, hates, hates butternut squash (particularly roasted.  This man needs an intervention!) he perked up when I mentioned my plan to make it. 

05 October 2010

Jewelry for an autumn wedding

I recently had the opportunity to create custom jewelry for a friend's bridal party to be worn in her autumn wedding.  Aside from the bride wanting a pendant style, gold-toned necklace with matching earrings I was free to create what ever I wanted.  I gathered up images of a broad range of styles and materials and showed them to the bride to gauge the aesthetic that she was going for.  She ended up really loving the idea of using chocolate and ivory fresh water pearls to match her ladies' chocolate, ivory and mango colors. 

04 October 2010

Lina

September was another incredibly busy month.  One of the highlights was cat sitting Ms. Lina for a week.  Lina, our neighbor's cat, was the perfect guest as usual.  We adore her and always welcome the chance to watch her whenever we can.  She spent most of the week on Dan's lap but I was able to steal some quiet lap time for a little while on her last night with us.


29 August 2010

Turkey Chili with White Beans

Okay, I admit it-  I am in a sad state of denial that we are still in the deep throws of summer.  It's just that we've been having such crisp, pleasant weather I had nearly convinced myself that Autumn had arrived.  I've been drinking hot tea all day long, wearing scarves and long sleeve shirts.  We've even been sleeping with our bedroom door open to our patio.  It's been wonderful. But of course I was kidding myself, for when I stepped outside this afternoon I was reminded about how wrong I was.  Today it was a solid ninety-one degrees and the air was thick with humidity.  A classic Philadelphia summer day.  But it didn't matter because I had already decided to make this Turkey and White Bean Chili and no sweltering summer heat was going to stand in my way. 

I am so happy I did because it turned out delicious.  Dan and I adjusted the recipe slightly- we added a bit more cumin and chili powder, one jalapeño pepper, fresh sweet corn and approximately one third cup of maple syrup, which might sound odd, but it sweetened the chili ever so slightly while rounding out the flavors of chili, cocoa powder and cinnamon quite nicely.  I will make it again, but there better be crunchy fallen leaves on the sidewalk and gourds sitting on my window sill.

25 August 2010

A new necklace

Here is another necklace I recently finished.  One of my favorites, it is a double stranded necklace composed of handcrafted polymer clay beads and vintage brass components.  The brass spacer beads came from an amazing brass necklace made in the 1970's that I picked up at an antique market in July.  I love them so much.  They've incorporated quite well into my new work and I will be sad when they are all used up.

The polymer clay beads were featured in a previous post as they basked in the sun after a final dip in the glaze.


Again, I promise to take more professional photos rather than using my Hipstamatic app and my iPhone :) But I must admit, the Hipstamatic photos seem to have captured the warmth of the brass rather well.

More to come! Be well dear readers.

24 August 2010

Resin and Polymer Clay Pendants

Well, I am delighted to write that I survived my very first craft fair.  I plan to post a nice recap for you, but I think I'll save that for Saturday morning when I am sitting on my couch all cozied up to a giant cup of coffee and a blanket.

Today, I thought I'd share a few photos of the pendants that I made.  If you remember from this post, they were constructed using the Klimt cane.  The cane slice was then set in an antique copper bezel and encapsulated under resin, which domes above the cane, magnifying and slightly distorting the design.  I just love them and am happy to report that they were a huge success at the Celticfest this past Saturday.  I wish I had made more, but they were, initially, an experiment.  Since they were such a success, I have plans to make a slew in antique brass as well as copper and sterling silver.  I can't wait to get started.


11 August 2010

New earrings, fresh off the work bench

(And by "work bench" I mean to say "coffee table". :)  Dear proper work space, we shall be together one day.  I promise.)

Here is a little peak into what I've been working on these past few days.  Lovely, dangly earrings.

09 August 2010

A weekend in the country with my Motormatic

I'd like to share a few photos I took with my Motormatic camera while enjoying a quite weekend in central Pennsylvania. 


My mother's wild flower garden.
I adore this photo. 

 
Mama goat sharing a quite moment with her baby, born just a few hours before. 
Union Country Fair
Union County, Pennsylvania 


27 July 2010

Works in progress

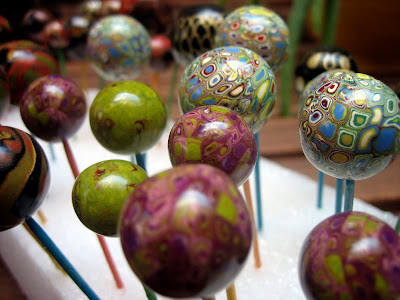
Here is a little sneak peak at what I've been working on as of late.  A few sets of beads basking in the sun.  These lassies have all been sanded using 400 and 800-grit sandpaper, glazed 3 times and are now ready to be strung.  I'm just awaiting a few more essential findings. 


14 July 2010

Where i've been

Oh my, it's been over one whole month since I've posted.  Yikes!  My only excuse is that I have been busy- very busy doing lots of things to post about.  

First off, I got accepted to my very first craft fair!  When I read the letter of acceptance, I was literally jumping up and down with giddiness.  I don't think I had been that excited since I found out I was accepted into graduate school five years ago.  But my excited spirit was quickly upstaged when reality sunk in- I had a lot of work ahead of me.  I'm talking an insane amount of work.

For the past few months I've been hard at work making beads for my polymer clay jewelry, working out possible designs in my sketch book, creating a bracelet for a friend of mine to wear on her honeymoon, reading as much as I can about selling at craft fairs and cutting up fabric for the totes and bags I plan to sell.  


Until this fair is over, at the end of August, our apartment is off limits to guests.  Polymer clay, beading supplies, a sewing machine and a huge tub of fabric have taken up permanent residence in our tiny living room until then.  My dad came to visit a month or so ago and I was ashamed at the cluttered living room but really, where to put it all?  

Despite my anxiety in getting everything accomplished, I am really looking forward to this event.  It is a Celtic Festival at Spyglass Ridge Winery, a winery nestled in Pennsylvania's picturesque Susquehanna River Valley- just a short distance from where I grew up.  I attended the festival last year as a guest with my parents and family friends.  We spent the day tasting great local wines and listening to very talented Celtic performers.  I thought the venue, which also hosts many craft vendors, would be a good one to start with.  Keep your fingers crossed in the hopes that I was right.

I also sneaked a little traveling in.  Dan and I took a road trip to Lake Lure, in the Blue Ridge Mountains of North Carolina, to spend a long weekend with my parents who were vacationing there.  After ten hours of driving, a six hour stop in a hotel to sleep for the night, and our first Waffle House ever, we arrived.


And we had a really lovely and relaxing time at a gorgeous lake where, among other movies, Dirty Dancing - one of my all time favorite movies - was filmed.  Yes, I channeled my inner Francis "Baby" Houseman for this trip.  

I'd like to share more photos from our holiday but I don't want to overload you with images- I'll save them for another post.

A few weeks later I took a much needed visit to Pittsburgh to see my younger sister. 

She took me to my very first weekend long music festival. (Yes, I am a depraved near-30 year old woman) The weekend was hot- we donned huge sunglasses, sun dresses and floppy hats- but it was  an incredible time where I met her wonderful friends and listened to some very talented musicians.  I will have more photos to post of this weekend as well once I get my D.I.Y. 35mm rigged Diana photographs developed. *fingers crossed they turn out well* :)

13 July 2010

Chicken Taco Casserole

For sometime now, and I am sure it is due to the five heat waves we've been hit with, Dan and I have been craving tacos.  I wasn't in the mood to deal with all of the prep work involved in making tacos (which, to be honest, is minuscule), so I set out to make a little chicken taco casserole, inspired by this recipe I found after doing a quick Google search.  The photo looked very appetizing but it was the  6-ingredient list that sold me.  So, I made a mental list of all that I needed and headed off the the grocery store.  I intended to replace the jar of pasta sauce (which is probably tasty but seems sort of strange to me to be in a Mexican dish) with some sort of prepared enchilada sauce. Unfortunately, the can of enchilada sauce was nearly $5, so I grabbed a can of tomatillos and figured we'd work something out.

Chicken Taco Casserole 
inspired by this Cheesy Chicken Taco Casserole

Ingredients
1.5 lbs of skinless, boneless chicken breasts
Taco seasoning of choice 
Salt and pepper 
9 (5-inch) corn tortillas (or 6, if like mine, yours are larger)
1 cup chopped cilantro
Taco Sauce (recipe to follow)
2 cups shredded Monterey Jack Cheese (8 oz.)
2 tomatoes, sliced

Sauce
1 can of tomatillos, drained
1/2-1 cup of your favorite salsa
1/3 cup of sour cream (more of less to suit your taste)
zest and juice of one lime
1 tablespoon of chili powder (again, more or less to suit your taste) 

Preparation
Preheat oven to 400°F. Season chicken with salt and pepper and 1/4 of taco seasoning package. Place in a skillet and add cold water to cover. Bring to a simmer over medium-high heat. Reduce heat to medium-low and cook, turning once or twice, until opaque and firm, about 10 minutes. 

While chicken is cooking, make sauce. In a blender, puree tomatillos, lime zest and juice, salsa, sour cream, and chili powder.  Taste test and experiment with ingredients until you reach the flavors desired.  Set aside.

Once chicken has finished cooking, remove (reserving approximately 1/2 cup of seasoned water), let cool and cut into small pieces or shred. You should have about 3 cups cut-up chicken.  Pour chicken back into skillet with the water you reserved and add your remaining package of taco seasoning.  Mix together.

Spread one-third of sauce over bottom of a 7-by-11-inch baking dish. Arrange 3 tortillas, slightly overlapping, on top. Sprinkle one-third of chicken and cilantro over tortillas. Top with a third of cheese. Make two more layers of sauce, tortillas, chicken, cilantro and cheese. Arrange tomato slices on final layer of cheese. Cover with foil and bake until bubbly, about 20 minutes. Remove foil and cook until top is lightly browned, 10 minutes more.

09 June 2010

Reversible Bag

Here are a few shots of my new reversible tote.  The pattern is from the ever-adorable and talented Novita of verypurpleperson.


I used a grey, home decor weight sofa cushion cover found in the discount bin at Ikea and a cream and grey fabric from Jomar.  I really love the result.  It's adorable.  I'm going to make some more, but I have plans to tweak the pattern to make it a little longer and a bit deeper.


I love this bag.

And here is a peak of the book I've been devouring most recently - The Handmade Marketplace by Kari Chapin.   So far it's been a really great and helpful read.  

Be sure to read about the original bag and download the tutorial here.

Gustav and the Klimt Cane

It's funny- the inspiration for the color scheme of the Klimt cane I posted about was the image below- a dessert dish from Anthropologie depicting colorful Koi frolicking amongst the seaweed.  Now, I am being honest with myself by admitting that I did not nail the color likeness.  At all.


Though many things were off, I think the greens were the main culprit.  Not only did I not mix them to the appropriate shade, but they took over the entire palette.  The result, I think, resembles more of the palette of a Klimt painting. (Ever. so. slightly.  Klimt's palette is absolutely genius. My beads are more of a reference to his work.)

                                          
   Gustav Klimt. Portrait of Emilie Flöge. 1902. Oil on canvas. Historical Museum of the City of Vienna, Vienna, Austria

Gustav Klimt (July 14, 1862 - February 6, 1918) was an Austrian Symbolist painter and prominent member of the Vienna Secessionist Movement and is this polymer clay cane's name's sake.  The pattern of ovals, squares and rectangles echoes the decorative motifs the artist utilized in so much of his work.

            Gustave Klimt. Hope II. 1907-1908. Oil and gold on canvas. Museum of Modern Arts, New York, NY

This observation, paired with my recent beautiful vintage raw brass findings acquisition, has given me the idea to do a series based on Klimt paintings and their palettes.  I think it will be a suitable homage to one of my favorite artists.

Gustav Klimt. The Beethoven Frieze: The Longing. Right wall. 1902. The Österreichische Galerie Belvedere, Vienna, Austria.


25 May 2010

Klimt cane and a day of pendant experiments

[First off, allow me to apologize for the mediocre photos.  I have to take them in the daylight, using my actual camera instead of my phone's camera.  The lighting here is pretty poor and the camera's flash was blowing out all of the colors so I used my phone's camera instead.]

This past Sunday I was finally able to devote some serious time to working on my polymer clay beads.  I thought I'd share a sampling of what I came up with. 
These lovelies were made using a Klimt, or retro, cane design.  I'm very happy with the end result and I am very excited about the plans I have for them.  However, they still have a lot of prep work ahead of them before they are ready to be strung and donned around the neck.  The final steps of sanding and the varnishing can be rather tedious but I believe that the time put in pays off in the end.


The image above shows two of the six pendants I designed.  This was an experiment that I had been thinking about for quite some time now.  It again utilized the Klimt Cane- at left, before reduction and at fight, after the cane was further reduced and then quartered.  Again, the clay will be sanded to a smooth, level surface and then encapsulated in a pool of resin that will be poured into the bezel settings, atop the baked polymer clay.  I can't wait to get started on this. 

I also ordered some lovely raw brass vintage findings today.  They make me swoon.  I can't wait until they are sitting at my doorstep.  My (soon to be) pretties: a simple solid brass chain that I plan to use with the Klimt beads, raw brass head pins, and stunning vintage brass leaves on stem branch findings that I will use for wrapped filigree.  So inspiring, they've already given me ideas for future polymer clay jewelery designs.

I'll be sure to photograph them (in better lighting) as soon as they arrive!

23 May 2010

Edna Mae's Sour Cream Pancakes

If one were to drop by our place on either a Saturday or a Sunday morning, chances are we are most likely making, have made, or are planning to make these delicious sour cream pancakes. 


Honestly, they are in full rotation and are perhaps the most popular dish we've ever made in a three month period.  Did I mention that they are delicious?  They are also a snap to make.  And best of all, these pancakes don't leave me feeling as though a I have a pile of bricks hanging out in my tummy.  Dan loves them so much I'm fairly certain he would eat them at least once a day if he could.


I originally stumbled upon this recipe while perusing  Smitten Kitchen, who got the recipe in Ree Drummond's The Pioneer Woman Cooks.  As Deb explains, they are Ree's husband's Grandma Edna Mae's sour cream pancakes.  Honestly, it puts a smile on my face every time Dan suggests these and I get to respond, "You mean Edna Maaaaae's sour cream pancakes?  You bet I want Edna Mae's pancakes."  I really love the idea that we, in our tiny little kitchen in Philadelphia, are carrying on someone's grandmother's pancake legacy.


You can follow the recipe with confidence, but I prefer to add the zest of half to one whole lemon.   One time I switched the vanilla extract for almond extract and they were divine.  I've even skipped the extract all together (I ran out) and they were still fabulous.  As Deb suggests, you can even replace the sour cream with Greek yogurt if you've of sour cream.  This is a helpful suggestion because many a'time I've used yogurt in place of my missing sour cream and it worked just fine.  The only thing missing is the tangy snap of the sour cream but that is forgivable because these puppies are just so light and tasty and I doubt that anything could do them wrong.


If you are a fan of the pancake or not so much (such as myself), try these.  You will not regret it.  I promise you.  A clean plate every time that would make Grandma proud.


Edna Mae's Sour Cream Pancakes

7 tablespoons all purpose flour
1 tablespoon sugar
1 teaspoon baking soda
1/ 2 teaspoon salt
1 cup sour cream 2 large eggs
1/2 teaspoon vanilla extract
Zest of 1/2 - 1 whole lemon (depending on size of lemon)
Butter
Maple Syrup

Heat a cast iron skillet, griddle or frying pan over medium-low heat; I find the cast iron skillet works rather well.

Stir the flour, sugar, lemon zest, baking soda and salt together in a medium bowl. Add the sour cream and stir together very gently being careful not to over mix (texture will be slightly uneven).  In a separate bowl whisk together eggs and vanilla.  Being careful not to over mix, add egg mixture to sour cream mixture.     

Melt butter in the skillet. Pour the batter into skillet 1/4 cup at a time. Cook for 1 to 1 1/2 minutes or until bubbles form on the surface, then flip the pancakes. Cook for another 45 seconds and remove. Repeat with the remaining batter. 


Makes approximately 9 - 12 (4-inch) pancakes.

19 May 2010

Chicken with Roasted Lemons, Green Olives, and Capers


Lemons, roasted + Olives + Capers = Perfection?  Almost.

I spotted this recipe a few weeks ago as I was hurriedly trying to plan out our week's meals so we could hit the market semi-prepared.  (This is a weekly occurrence with me.  If I could only decide the night before to chose 3-4 recipes to make for the week, rather than 20 minutes before we decide to leave, I (and my wallet) would probably be much better off.)  The dish immediately caught my eye because it seemed incredibly easy and the minimal ingredient list included Mediterranean ingredients of olives and lemons.  Perfection.  Unfortunately, I never had the chance to make it until last night.  

The recipe was simple enough to make but seemed like it took a long time.  Had I purchased pitted olives and if I had a working space larger than a cookie sheet, things might have moved along faster.  Also, I was so engrossed in pitting my olives and catching up on last week's episode of Lost so that I would be prepared for this week's episode, I completely forgot to take photos.  And by the time the dish was plated (at 9pm) I was ravenous with hunger.

(In the absence of not-so-fantastic food photography, I offer this photo that I shot a few years ago in Assisi, Italy.  Olive trees peaking through the fog- appropriate, right? : ) )


I really liked the concept of this dish and the method of preparation- quickly searing the chicken to lock in the juices and develop a crispy outer shell, and then simmering it in a very simple sauce until it is reduced.  This method allowed the chicken to remain moist and tender.  I did not pound my chicken breasts out as many reviewers recommended because my pieces were already quite thin and they seemed to have cooked evenly.  If you find that your pieces are on the thick side, I'd recommend following the recommendations of the reviewers. 

Unfortunately I felt the flavor profile was slightly off, and Dan agreed.  Multiple reviewers noted the olives impart a  bitter edge to the sauce; and they were right- the dish was bitter.  I used green Greek olives but next time around I might used a mixture of green and kalamata olives.  Side dishes of simple mashed potatoes with Greek yogurt and sautéed fresh baby spinach with garlic really helped to take the bitter edge off the dish.  

All in all I was happy with it  and I will probably have another go at it, though with a few tweaks next time around- I will make the olive switch, lesson the butter by half, and I will use a  white wine to deglaze the pan, replacing it with some of the stock.  Another commenter found that adding a can of artichoke hearts will cut the bite of the olives nicely, so perhaps I will try that.
This recipe reminded me of a dish Melissa d'Arabian prepared on the Next Food Network Star.  I made a mental note that I would try to make her versatile Rustic Lemon-Onion Chicken at some point and then I forgot all about it, until last night.  Now, with it fresh in my mind I'll be sure to add the ingredients to this week's market list and give it a try.

Chicken with Roasted Lemons, Green Olives, and Capers

Ingredients:
Roasted Lemons
    12 thin lemon slices (from 2 lemons)
    Olive Oil 

Chicken
    4 large boneless skinless chicken breast halves
    All purpose flour
    5 tablespoons of olive oil 
    1/2 cup of green Sicilian olives or other brine cured olives 
    2 tablespoons of drained capers
    1 1/2 cups of chicken stock or low-salt chicken broth 
    1/4 cup (1/2 stick) of butter  cut into 4 pieces (I used unsalted)
    3 tablespoons of chopped fresh parsley 
       (omitted because I did not have any on hand) 


Preparation:
For roasted lemons: 
Preheat oven to 325°F. Line baking sheet with parchment paper. Arrange lemon slices in single layer on prepared sheet. Brush lemon slices with olive oil; sprinkle lightly with salt. Roast until slightly dry and beginning to brown around edges, about 25 minutes. (Lemons can be made 1 day ahead. Transfer to container. Cover; chill.)

For chicken:
Sprinkle chicken with salt and pepper. Dredge chicken in flour to coat both sides; shake off excess. Heat 5 tablespoons oil in heavy large skillet over high heat. Add chicken and cook until golden brown, about 3 minutes per side. Stir in olives and capers. Add stock and bring to boil, scraping up browned bits from bottom of skillet. Boil until liquid is reduced to syrup consistency, turning chicken over after 3 minutes, about 5 minutes. Add butter, roasted lemon slices, and 2 tablespoons parsley; simmer until butter melts and chicken is cooked through, about 2 minutes. Season with salt and pepper. Transfer to platter. Sprinkle with remaining 1 tablespoon parsley.

10 May 2010

Thai Shrimp Curry

Thai Shrimp Curry, or what Dan endearingly refers to as the "Bomb Ass Shrimp Jawn",  pops up at least once every few months in our kitchen.  We LOVE it.  We love anything with curry really, and we find every excuse to eat it.  Yesterday's lazy Sunday was no exception.  

I've been preparing this recipe from Bon Appétit for a few years now, altering it every now and then or preparing it just as the directions suggest.  In either case, it has never failed us.  Yesterday we decided to mix things up a little bit by adding another fish to this spicy Thai dish.

We headed over to our wonderful fishmonger at the Reading Terminal Market, and picked up Chilean Sea Bass chunks to mingle with the shrimp.  Because we added the sea bass, we cut the pound of shrimp called for down to a half pound and it was the perfect amount for two people, with enough left over for lunch the following day.

This recipe is straight forward and incredibly easy.  I highly recommend it if you are looking for a quick and easy curry dish. 


Begin with the preparation of your shrimp by rinsing, peeling and deveining them and; set aside.  Next, prepare your vegetables- thinly slice one cup of onion and approximately 8 green onions.  Heat sesame oil (or peanut oil- whatever you have on hand) in a large, deep skillet and add onion.  (I sometimes add approximately one tablespoon of minced ginger to the mix at this point.  I forgot to buy it yesterday so this dish was sans ginger but still quite tasty.)  Once the onions have softened and begin to brown, reduce heat and add the lemongrass, green onions and curry. 


The recipe calls for one to two tablespoons of green curry.  Because Dan and I have been finding that our curry dishes have been falling short of our desired spiciness factor and because we are daring individuals, I added three heaping tablespoons to the dish and was near certain that I would have to add more.  Oh, how wrong I was.  This was the first time we've used the Maesri brand curry for this dish and I can confidently say that it packs far more heat than our old stand by, which usually requires an entire jar for one dish in order to make our taste buds happy.  The dish was delicious but it was HOT.  Dan and I were both struggling.  Next time I use the Maesri curry, I will add only two tablespoons.


Stir the curry paste and green onions until fragrant, approximately one minute.  Add coconut milk, chicken broth (you can substitute vegetable broth, if you prefer), fish sauce, and sugar and bring to a boil.  Add tomatoes and boil for two minutes.  


At this point I prepared my noodles.  We used cellophane, or mung bean, noodles, but you could use whatever you prefer, such as rice noodles or basmati rice.  To prepare the cellophane noodles, I poured boiling water over a few handfuls of the noodles and let sit until they were softened.  I then drained them well in a colander and set aside until the meal was complete.


After your curry has come to a boil and is smelling divine, add shrimp (and in the case the chilean sea bass) and cook until shrimp is opaque in center and the sea bass is cooked all the way through.


While your fish is cooking, prepare your cilantro and lime wedge garnish.   


Spoon noodles into a bowl and pour curry on top.  Garnish with cilantro and lime wedges (or whatever you prefer) and enjoy!  We paired this meal with a Gewurztraminer from the Finger Lakes and 500 Days of Summer.  Though the wine enhanced the heat of the dish, it was a delicious pairing and the perfect ending to a lazy Sunday.


Note: 
This recipe to could be altered in many ways.  The fish could be eliminated entirely and more vegetables, or even chicken, added in its place.  The original recipe calls for two pounds of shrimp.  If you intend to serve this to more than two people I would consider upping the amount of  shrimp. 

Also, though the Chilean Sea Bass was delicious, I don't think I will add it to this dish again.  Chilean Sea Bass is severely over fished and is listed as "avoid" on the Monterey Bay Aquarium's Seafood Watch list.  Had I checked the list before hand I would never have included it.


Thai Shrimp Curry
adapted from Bon Appétit

Ingredients:
1 tablespoon sesame oil
1 cup thinly sliced onion
1 cup sliced green onions (approx. 8)
1 three inch piece of lemongrass, halved and then quartered lengthwise 
1 to 2 Tablespoons Thai green curry paste (... we used three. three heaping.)
1 14 oz. can of unsweetened coconut milk
1 cup of low salt chicken broth
3 tablespoons Thai fish sauce
2 teaspoons sugar
1 cup diced plum tomatoes
1/2 uncooked shrimp, peeled and deveined
1/2 pound Chilean sea bass chunks
Chopped fresh cilantro
Lime wedges

Heat sesame oil in heavy large skillet over medium-high heat. Add sliced onion; stir-fry until soft and beginning to brown, about 4 minutes. Reduce heat to medium. Add green onions and curry paste; stir until fragrant, about 1 minute. Add coconut milk, chicken broth, fish sauce, and sugar; bring to boil. Add tomatoes and boil 2 minutes. Add shrimp and cook just until opaque in center, stirring often, about 3 minutes. Transfer curry to large shallow bowl. Garnish with cilantro. Serve, passing lime wedges separately.